Applicable for version 7.2.1 and 7.2.2
Upload and Sort Clock Data
The Attendance module for the flexHR®HRMS system allows the clock data to be uploaded directly from clocks, from text files or be resorted for further processing.
Upload/Sort Data from Clocks
flexHR®HRMS allows the clock data to be collected directly from the clock device. System supports those devices with command driven data collection. Otherwise, you are advised to use the option upload & sort from text file.
Steps to process:
1. Drop down the Process menu and click on Upload and Sort Clock Data > Update/Sort data from Clocks option.
2. The Update/Sort data from Clocks screen will be shown as the following:

3. Input the following information to run the process.
- Start Date….End Date
- Enter the start and end date to upload data from clock and at the same time, performing the sorting as well.
- Clock Model
- Enter the clock model available. Consult your software vendor if possible.
NOTE:
System will refer to the text position of the clock model that is defined at Attendance > Setup > Clock Setup. It uses it to identify the position of employee No., date, time and clock address.
- Collect fresh clock data only?
- If you only wish to collect the fresh clock data, then check the checkbox. Otherwise, system will perform data recovery from clock base on the start and end date specified.
- Remove generated Auto Clock Records?
- Check the checkbox if you want to remove the In/Out records that are generated by the system.
NOTE:
In/Out records that are generated by system will not create physically in Clock Data. It will only create in Attendance Record. Hence, if employee change from not require clocking to require clocking, the system unable to remove the clock time that was created previously. That’s why we need this parameter to help system to remove it smartly.
- Process Attendance Records?
- Check the checkbox if you want the system process attendance records after the clock data has been uploaded.
- Diagnose Sorting/Calculations?
- Check on the checkbox if you want the system generate the explanation on the sorting and calculations of the attendance records.
- Query Code
- Specify the query code by choosing the code in the List.
NOTE:
Query code must be pre-defined under MAIN > Setup > Query.
4. Click on the ‘Filter’ button if you like to do filtering, or press on the ‘OK’ button to proceed.
NOTE:
You may skip the ‘Filter’ part if you would like to upload/sort data from clock for all employees.
5. Click on the ‘SEARCH’ button to proceed with the process.
NOTE:
After clock data being uploaded, system will update the last clock collect date & time in Main > Setup > General Setup > Attendance Parameters.
Upload/Sort Data from Text Files
flexHR®HRMS allows the clock data to be collected from the text file, which is usually generated from the clock device.
Steps to process:
1. Drop down the Process menu and click on Upload and Sort Clock Data, Update/Sort data from Text Files option.
2. The Update/Sort data from Text Files screen will be shown as the following:
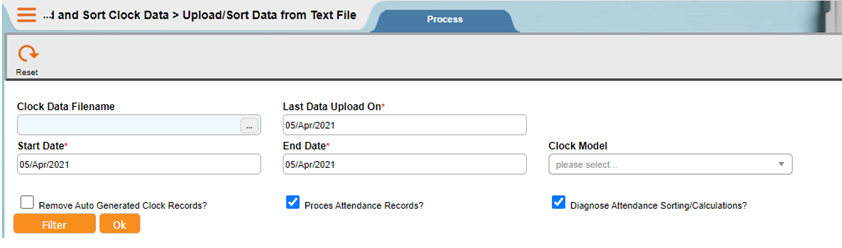
3. Input the following information to run the process.
- Clock Data Filename
- Specify the Clock Data Filename, which refers to the location of the text file.
NOTE:
Example
C:\TMS\CLOCK.TXT which the clock.txt located at TMS folder in the drive C.
- Last Data Upload on
- System will display the information that retrieve from Main>Setup>General Setup>Attendance Parameters.
- Start Date….End Date
- Enter the start and end date to upload data from clock and at the same time, performing the sorting as well.
- Clock Model
- Enter the clock model available. Consult your software vendor if possible.
NOTE:
System will refers the text position of the clock model that was defined at Attendance > Setup > Clock Setup. It uses it to identify the position of employee No., date, time and clock address.
- Remove generated Auto Clock Records?
- Check the checkbox if you want to remove the In/Out records that are generated by the system.
NOTE:
In/Out records that are generated by system will not create physically in Clock Data. It will only create in Attendance Record. Hence, if employee change from not require clocking to require clocking, the system unable to remove the clock time that was created previously. That’s why we need this parameter to help system to remove it smartly.
- Process Attendance Records?
- Check the checkbox if you want the system process attendance records after the clock data has been uploaded.
- Diagnose Sorting/Calculations?
- Check on the checkbox if you want the system generate the explanation on the sorting and calculations of the attendance records.
- Query Code
- Specify the query code by choosing the code in the List.
NOTE:
Query code must be pre-defined under MAIN > Setup > Query.
4. Click on the ‘Filter’ button, if you wish to upload the clock data for certain departments or employees.
NOTE:
You may skip the ‘Filter’ part, if you need to upload and sort clock data for all the employees.
Resort Existing Clock Data
Whenever there are changes on the raw clock data which the user had amended from system, there will be a need to resort the clock data again. Besides, if employee change shift group or schedule, this process needs to be run as well.
Steps to process:
1. Drop down the Process menu and click on Upload and Sort Clock Data, > Resort Existing Clock Data option.
2. The Resort Existing Clock Data screen will be shown as the following:
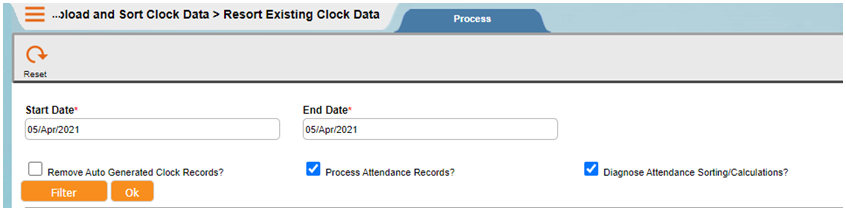
3. Input information below to run the process.
- Start Date….End Date
- Enter the start and end date to upload data from clock and at the same time, performing the sorting as well.
- Remove generated Auto Clock Records?
- Check the checkbox if you want to remove the In/Out records that are generated by the system.
NOTE:
In/Out records that are generated by system will not create physically in Clock Data. It will only create in Attendance Record. Hence, if employee change from not require clocking to require clocking, the system unable to remove the clock time that was created previously. That’s why we need this parameter to help system to remove it smartly.
- Process Attendance Records?
- Check the checkbox if you want the system process attendance records after the clock data has been uploaded.
- Diagnose Sorting/Calculations?
- Check on the checkbox if you want the system generate the explanation on the sorting and calculations of the attendance records.
- Query Code
- Specify the query code by choosing the code in the List.
NOTE:
Query code must be pre-defined under MAIN > Setup > Query.
4. Click on the ‘Filter’ button, if you wish to upload the clock data for certain departments or employees.
NOTE:
You may skip the ‘Filter’ part if you need to upload and sort clock data for all the employees.
5. Click on the ‘SEARCH’ button to proceed with the process.
Compute Attendance Hours
Whenever there are changes in the setting for allowances, deductions, overtime, and etc. The attendance records need to be computed again to get the latest result.
Steps to process:
1. Drop down the Process menu and click on Compute Attendance Hours option.
2. The Compute Attendance Hours screen will be shown as the following:

3. Input information below to run the process.
- Start Date….End Date
- Enter the start and end date to upload data from clock and at the same time, performing the sorting as well.
- Last Data Upload on
- System will display the information that retrieve from Main > Setup > General Setup > Attendance Parameters.
- Diagnose Calculations?
- Check on the checkbox if you want the system generate the explanation on the calculations of the attendance records.
- Query Code
- Specify the query code by choosing the code in the List.
NOTE:
Query code must be pre-defined under MAIN > Setup > Query.
4. Click on the ‘Filter’ button, if you wish to upload the clock data for certain departments or employees.
NOTE:
You may skip the ‘Filter’ part if you need to upload and sort clock data for all the employees.
5. Click on the ‘SEARCH’ button to proceed with the process.
Close Attendance Period
flexHR®HRMS Attendance system has the feature to lock the attendance record to prevent the user from further editing or processing .
Steps to process:
1. Drop down the Process menu and click on Close Attendance Period option.
2. The Close Attendance Period screen will be shown as the following:
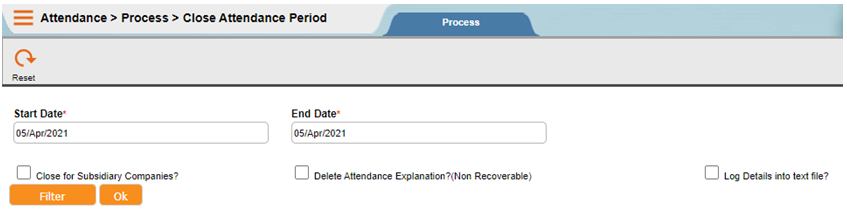
3. Input the information to run the process.
- Start Date….End Date
- Enter the start and end date that you wish to lock.
- Close for Subsidiary Companies?
- Check the checkbox if you want to lock the attendance for the subsidiary companies as well.
- Delete Explanation?
- Check the checkbox if you want to purge off the explanation for selected attendance records.
- Query Code
- Specify the query code by choosing the code in the List.
NOTE:
Query code must be pre-defined under MAIN > Setup > Query.
4. Click on the ‘Filter’ button, if you wish to upload the clock data for certain departments or employees.
NOTE:
You may skip the ‘Filter’ part if you need to upload and sort clock data for all the employees.
5. Click on the ‘SEARCH’ button to proceed.
NOTE:
System will only filter by company access security and date range as specified during attendance closing. This process will not check against employee access security.
Unclose Attendance Period
flexHR®HRMS Attendance system has the feature to unlock the attendance record for certain range of periods. Sometime after user had closed the attendance period and found that there are still some changes to amend, user needs to unclose the attendance record for that period.
Steps to process:
1. Drop down the Process menu and click on Unclose Attendance Period option.
2. The Unclose Attendance Period screen will be shown as the following:
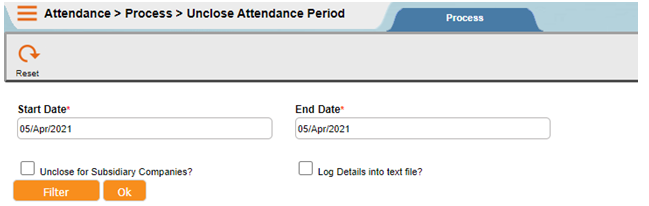
3. Input the information to run the process.
- Start Date….End Date
- Enter the start and end date that you wish to undo the lock.
- Unclose for Subsidiary Companies?
- Check the checkbox if you want to unlock the attendance for the subsidiary companies as well.
- Query Code
- Specify the query code by choosing the code in the List.
NOTE:
Query code must be pre-defined under MAIN > Setup > Query.
4. Click on the ‘Filter’ button, if you wish to upload the clock data for certain departments or employees.
NOTE:
You may skip the ‘Filter’ part if you need to upload and sort clock data for all the employees.
5. Click on the ‘SEARCH’ button to proceed.
NOTE:
System will only filter by company access security and date range as specified during undo attendance closing. This process will not check against employee access security.
Archive Attendance Record
flexHR®HRMS Attendance system has the feature to move the attendance records into a history file for certain range of periods. This will reduce the file size of attendance record tables and help to speed up the system performance especially when searching attendance records.
Steps to process:
1. Drop down the Process menu and click on Archive Attendance Record option.
2. The Archive Attendance Record screen will be shown as the following:
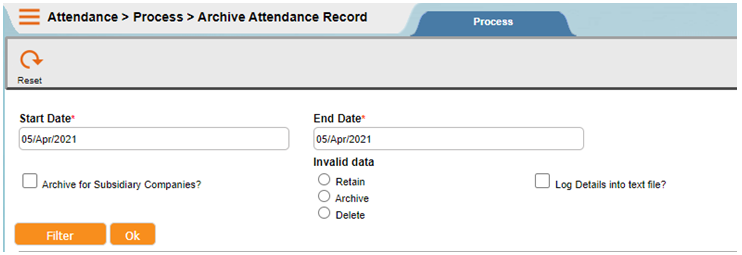
3. Input the information to run the process.
- Start Date…. End Date
- Enter the start and end date that you would like attendance records to be archived.
- Archive for Subsidiary Companies?
- Check the checkbox if you want to archive the attendance for the subsidiary companies as well.
- Query Code
- Specify the query code by choosing the code in the List.
NOTE:
Query code must be pre-defined under MAIN > Setup > Query.
4. Click on the ‘Filter’ button, if you wish to upload the clock data for certain departments or employees.
NOTE:
You may skip the ‘Filter’ part if you need to upload and sort clock data for all the employees.
5. Click on the ‘SEARCH’ button to proceed.
NOTE:
System will only filter by company access security during data archiving. This process will not check against employee access security.
The attendance record must be closed before system can archive.
Restore Attendance Record
flexHR®HRMS Attendance system has the feature to restore archived attendance records from the history file should user wish to refer back to these historical data.
Steps to process:
1. Drop down the Process menu and click on Restore Attendance Record option.
2. The Restore Attendance Record screen will be shown as the following:
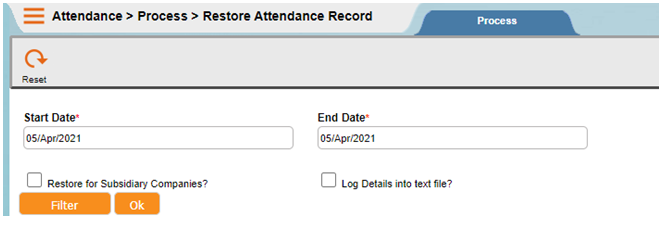

3. Input the information to run the process.
- Start Date…. End Date
- Enter the start and end date that you would like attendance records to be restored.
- Restore for Subsidiary Companies?
- Check the checkbox if you want to restore the attendance for the subsidiary companies as well.
- Query Code
- Specify the query code by choosing the code in the List.
NOTE:
Query code must be pre-defined under MAIN > Setup > Query.
4. Click on the ‘Filter’ button, if you wish to upload the clock data for certain departments or employees.
NOTE:
You may skip the ‘Filter’ part if you need to upload and sort clock data for all the employees.
5. Click on the ‘SEARCH’ button to proceed.
NOTE:
System will only filter by company access security during data archiving. This process will not check against employee access security.
