Applicable for version 7.2.1 and 7.2.2
Leave Record
In Enterprise, the user can view existing Leave records for editing, and create new Leave records for employees. A Leave record is created when an employee has been approved by his/her supervisor. When the Leave record is saved, Leave Entitlement field values will be automatically updated in the Leave record screen.
Steps to enter data:
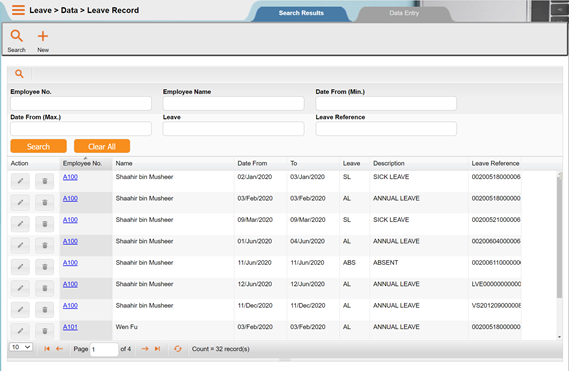
1. Click to select Leave Record option from the Data menu. A List screen will appear.
2. One of the following actions will apply:
NOTE:
- To locate a specific Leave record: – Enter value(s) for the field(s). The user can select an employee’s record from the List screen.
Or
- To add a new Leave record: – Click the ‘New’ icon.
3. An employee’s leave record detail will be displayed in the Leave Record screen as shown in the following page:
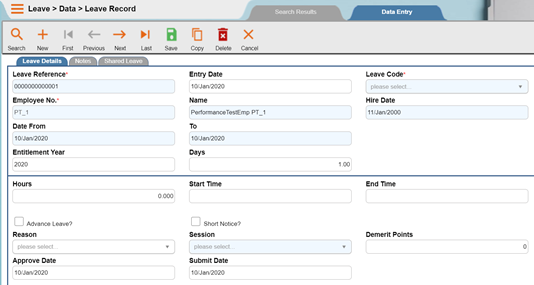
4. To create a new leave record, click the ‘New’ button in the toolbar. Enter the values for the fields in the Leave Details screen tab:
Leave Details Tab
- Leave Reference
- This is an identifier that can be entered by the user or generated by the system.
- Entry Date
- Enter the date of entry of the leave record in “ddmmyyyy” format.
- Employee No
- Press the dropdown button to select from a pick list. The Employee# pick list will appear showing the employee numbers and names of the employees to be selected. Click to select and then click the ‘OK’ button to select the employee.
- Leave Code
- Press the dropdown button to select from a pick list. The Leave Code pick list will appear. Click to select and then click the ‘OK’ button.
- Date From.…To
- Enter the leave period in “ddmmyyyy” format.
- Entitlement Year
- Input the leave entitlement year used to offset the leave applied. The Year input for employee XYZ is 2003, not 2004 (please refer to the example provided in the Introduction section for this “How to” topic).
NOTE:
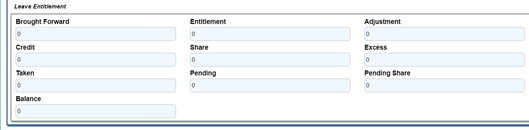
The bottom half of the Leave Record screen will refresh with updated values for the entitlement fields after the Year value is entered.
- Days
- The duration of leave taken is calculated by the system, based on the start and end date. During the leave days calculation, the system will deduct the days shall the leave date range cover days like holiday/shutdown/off day/rest day.
NOTE:
Currently, the system base on below written steps to check whether the leave day should be deducted.
Step 1: To retrieve the shift code in each day.
The system will retrieve the shift code in below sequence:- 1st Daily Attendance
2nd Individual Schedule 3rd Shift Group
Step 2: Upon retrieving the Shift from Step 1, there are two possibilities:- Case 1: The Shift Code is EMPTY.
When this situation happens, we will make assumption this day is a working day. The system will then check whether this day is a holiday/shutdown day.
The system will consider this day leave taken to be deducted when This day is a HOLIDAY/SHUTDOWN Day.
Case 2: The Shift Code is NOT EMPTY.
The system will consider this day leave taken to be deducted when This day is NOT a WORKING Day. Or
This day is a WORKING Day and also a HOLIDAY/SHUTDOWN Day. WORKING Day
The above will return ‘YES’ when:- Day type (shift code) = ‘W’
Day type (shift code) = ‘V’
Day type (shift code) = ‘O’ and the Leave Code applied is VALID for ‘Off Day?’ Day type (shift code) = ‘R’ and the Leave Code applied is VALID for ‘Rest day?’
Day type (shift code) = ‘H’ and the Leave Code applied is VALID for ‘Public Holiday?’ or ‘Company Holiday?’
Day type (holiday/shutdown) = ‘P’ and the Leave Code applied is VALID for ‘Public Holiday?’
Day type (holiday/shutdown) = ‘C’ and the Leave Code applied is VALID for ‘Company Holiday?’
Day type (shift code/holiday/shutdown) = ‘S’ and the Leave Code applied is VALID for ‘Shutdown Day?’
HOLIDAY/SHUTDOWN Day
The above will return ‘YES’ when:
This day is set as Holiday or Shutdown And Employee is neither being excluded from Shift Group or Individual And The Leave Code applied is NOT valid for: –
Public Holiday Or Company Holiday Or Shutdown Day
- Hours
- Specify the number of hours to be adjusted for the leave applied example late in, early out and time off.
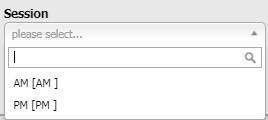
- Session
- Press
 button. The Session pick list will appear. Click to select and then click the ‘OK’ button. This Session function only available for Day=0.5.
- Press
- Advance?
- Check box if the Date From leave period is in advance.
- Short Notice?
- Check box if the Date From leave period is considered to be a short notification for the leave applied.
- Reason
- Press the dropdown button. The Reason pick list will appear. Click to select and then click the ‘OK’ button.
- Demerit Points
- Enter the demerit points that will be deducted from the particular employee accordingly.
5. Click the ‘Save’ button in the toolbar to save the record.
6. Next, click the Notes screen tab in the Leave Record screen. The Notes screen tab will appear as shown below:
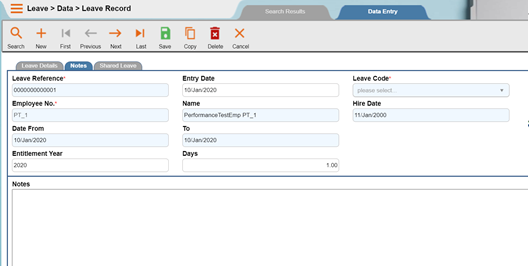
7. The Leave Reference, Entry Date, Date From….To, Year, and Days fields automatically display the values entered earlier in the Leave Details screen tab. Name and Hire Date will automatically display once user elect the Employee No. Enter a description for the leave.
8. Click ‘Save’ button.
9. Click the Cancel button in toolbar to exit from this screen.
NOTE:
Leave entitlement policy varies from one company to another. Leave entitlement can be based on one of the following: calendar year, financial year and anniversary year.
See related topic on “How to Update Leave Adjustment” in the LEAVE module
Leave Adjustment
In Enterprise, a user can modify an employee’s current leave entitlement balance. This balance is computed by the system based on leave entitlement and recorded leave. Such modifications can be attributed to a change in company’s policies on leave, or an error in leave record entry. Enterprise allows the user to enter leave adjustments in 3 different ways in the Adjustment Type field in the Leave Adjustment Record screen. The adjustment types can be regarded as year-to-date sums for leave entitlement. These 3 adjustment codes/types are explained as follows:
- Type 1: Adjustment B/Forward
- This option is reserved for bringing forward any remaining leave days that is unused from previous year leave entitlement.
NOTE:
Example:
Employee Susan Best has a remaining leave balance of 5 days from previous year leave entitlement. Her remaining balance of 5 days is entered as a Leave Adjustment record with an entry of 5 in the Days field in the Leave Adjustment Record screen.
- Type 2: Adjustment Difference
- This option is used when the leave balance is incorrect.
NOTE:
Example:
Employee Susan Best has a remaining leave balance of 5 days from previous year leave entitlement. Her remaining balance of 5 days is entered as a Leave Adjustment record with an entry of 5 in the Days
- Type 3: Adjustment Balance
- This option is used when the leave balance is incorrect.
NOTE:
Example:
An employee leave balance of 10 days is incorrect. The actual leave balance is 13 days. The payroll clerk then enters 13 days in the Days field in the Leave Adjustment Record screen.
The results of leave adjustment records for employees can be viewed under Employee Leave Balance/History option in the Inquiry menu. Please refer to the Inquiry topic on “How to View Leave Balance/History.”
Steps to enter data:
1. Select the Leave Adjustment option from the Data pull-down menu. A List screen will appear.
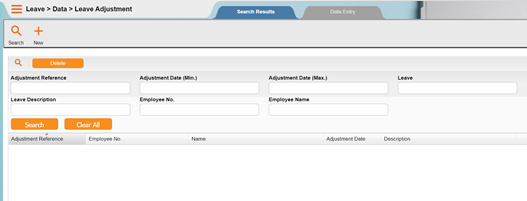
2. One of the following actions will apply:
NOTE:
- To locate a specific Leave Adjustment record: – Enter value(s) for the field(s. The user can select an employee’s record from the List screen.
Or
- To add a new Leave Adjustment record: – Click the ‘New’ button.
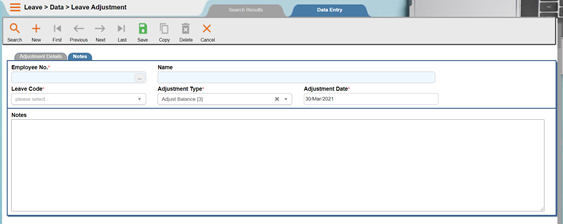
3. The employee’s leave adjustment details will be displayed in the Leave Adjustment Record screen as shown below:
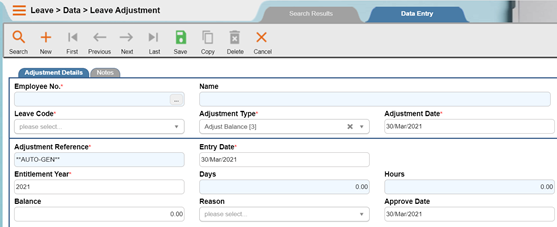
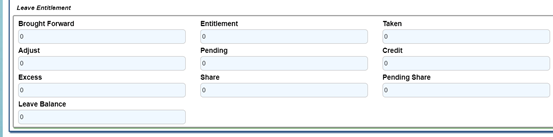
4. To create a new leave record, click the ‘New’ button in the toolbar. Enter the values for the fields in the Adjustment Detail screen tab:
Adjustment Detail Tab
- Adjustment Reference
- This is an identifier that can be entered by the user or generated by the system.
- Submit Date
- Enter the date in “ddmmyyyy” format for when the leave adjustment record is to be submitted to the system for processing. This is similar to the date of entry for the Leave Adjustment record.
- Employee No
- Press the dropdown button. The Employee No pick list screen will appear. Click to select and then click on the ‘OK’ button.
- Leave Code
- Press the dropdown button. The Leave Code pick list screen will appear. Click to select and then click on the ‘OK button.
- Adjustment Type
- Press the dropdown button. The Adjustment Type pick list screen will appear. Select by double clicking the desired option.

- Adjust Date
- Enter the date in “ddmmyyyy” format for when the adjustment is to take effect.
- Year
- Input the leave entitlement year used to offset the leave applied.
- Days
- Specify the number of days to be adjusted for the leave applied.
- Hours
- Specify the number of hours to be adjusted for the leave applied.
- Balance
- Specify the number of balance to be adjusted for the leave applied.
- Reason
- Press the dropdown button. The Reason pick list screen will appear. Click to select and then click on the ‘OK’ button.
- Approve Date
- Enter the approval date in the “ddmmyyyy” format for the leave adjustment.
5. Click the ‘Save’ button in the toolbar to save the record.
6. Next, click the Notes screen tab to enter necessary notes for the leave adjustment. The Notes screen tab will appear as shown below:
7. Click ‘Save’ button and the ‘New’ button in the toolbar to save and enter each Leave Adjustment record. The ‘Delete’ and the ‘Cancel’ button can be used to cancel records.
8. Click the ‘Cancel’ button in toolbar to exit from application.
NOTE:
Example:
The ‘Employee No’, ‘Leave Code’, ’Adjustment Type’ and ‘Adjustment Date’ fields display input values that were entered in Adjustment Detail screen tab.
NOTE:
Leave entitlement policy varies from one company to another. Leave entitlement can be based on one of the following: calendar year, financial year and anniversary year.
See related topic on “How to Update Leave” in the LEAVE module.
Leave Credit
Leave credit is the extra leave hour(s) or days(s) credited to employee leave balance due to certain reasons. An example of a leave credit record is provided as follows:
NOTE:
Example:
A public holiday falls on a Saturday. Thus, the company replaces credit 1 day leave to annual leave for all the employees.
Steps to enter data:
1. Drop down the Data menu and then click Leave Credit option. A List screen will appear.
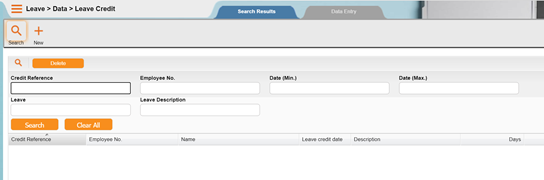
2. One of the following actions will apply:
NOTE:
- To locate a specific Leave credit: – Enter value(s) for the field(s). The user can select an employee’s record from the List screen.
Or
- To add a new Leave record: – Click the ‘New’ icon.
3. An employee’s leave credit detail will be displayed in the Leave Credit screen.
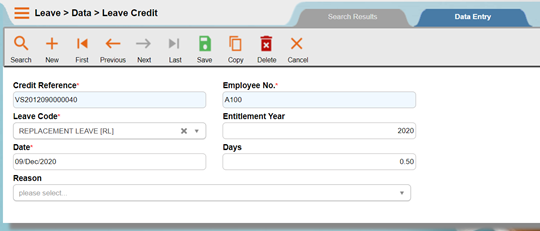
4. To create a new leave credit record, click the ‘New’ button in the toolbar. Enter the values for the fields in the Leave Credit:
- Credit Reference
- This is an identifier that can be entered by the user or generated by the system.
- Employee No.
- Click on the dropdown button. The Employee# pick list will appear as below. Click to select and then click on the ‘OK’ button.
- Leave Code
- Click on the dropdown button. The Leave Code pick list will appear. Click to select the leave code and then click on the ‘OK’ button.
- Leave Credit Date
- Specify the date in “ddmmyyyy” format denoting when the leave credit record is created.
- Entitlement Year
- Specify the year for which the leave credit record is created.
- Days
- Specify number of days credited to the leave balance.
- Hours
- Specify number of hours credited to the leave balance.
- Reason
- Click on the dropdown button . The Reason pick list will appear. Click to select and then click on the ‘OK’ button.
5. Click ‘Save’ button to save the entered record and the ‘New’ button in the toolbar allow user to enter new leave credit record. The ‘Delete’ button and the ‘Cancel’ button can be used to cancel records.
6. Click the ‘Logout’ button in toolbar to exit from application
NOTE:
See related topic on “How to Setup Other Codes” in the MAIN module
Fast Data Entry
Leave data and leave credit can be updated simultaneously for a group of filtered leave records through fast data entry. Two options are grouped under Fast Data Entry; Fast Leave Data and Fast Leave Credit.
NOTE:
Example:
Employees filtered have food poisoning on the specific day. So the user can concurrently enter the leave record for all the employees instead of entering leave record one by one.
Fast Leave Data
Steps to enter data:
1. Drop down the Data menu and then click Fast Data Entry followed by Fast Leave Data. The Quick Data Entry for Leave screen will appear as shown below.
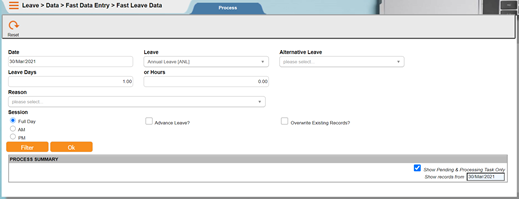
2. Provide input to the fields in the Quick Data Entry For Leave screen:
- Date
- Specify the leave date in “ddmmyyyy” format.
- Leave Code
- Click on the dropdown button. The Leave Code pick list will appear. Click to select and then click on the ‘OK’ button.
- Alternative Leave Code
- Click on the dropdown button. The Leave Code pick list will appear. Click to select and then click on the ‘OK’ button. This alternative leave code selected acts as backup if the leave balance under the leave code set earlier is used up
- Leave Days or Hours
- Specify the number of days or hours for the leave.
- Session
- Specify the session of the leave applied either is Full Day, AM or PM. AM and PM only applicable for Day=0.5
- Advance Leave?
- Tick the checkbox if advance leave is allowed. By default, the checkbox is unchecked.
- Reason Code
- Click on the dropdown button. The Reason pick list will appear. Click to select and then click on the ‘OK’ button.
- Overwrite Existing Records?
- Tick the checkbox to replace existing leave records created. By default, this checkbox is unchecked.
- Query Code
- Click on the dropdown button . Select the query code from the pick list.
3. To select criteria for the leave records, click the ‘Filter’ button. The Filter Parameters screen will appear. Input the value range or value list for record filtering.
4. Click the ‘OK’ button after entering all the necessary criteria and computation will be started. Click ‘Cancel’ button will abort the Fast Data Entry for Leave process.
NOTE:
See related topic on “How to Setup Other Codes” in the MAIN module.
Fast Leave Credit
Steps to enter data:
1. Drop down the Data menu and then click Fast Data Entry followed by Fast Leave Credit. The Fast Data Entry for Leave Credit screen will appear as shown below.
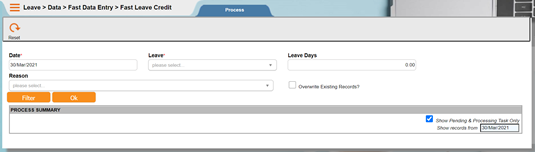
2. Provide input to the fields in the Quick Data Entry For Leave Credit screen:
- Date
- Specify the leave date in “ddmmyyyy” format.
- Leave Code
- Click on the dropdown button. The Leave Code pick list will appear. Click to select and then click on the ‘OK’ button.
- Leave Days or Hours
- Specify the number of days or hours for the leave.
- Reason Code
- Click on the dropdown button . The Reason pick list will appear Click to select and then click on the ‘OK’ button.
- Overwrite Existing Records?
- Tick the checkbox to replace existing leave records created. By default, this checkbox is unchecked.
NOTE:
See related topic on “How to Setup Other Codes” in the MAIN module.
