Applicable for version 7.2.1 and 7.2.2
Change Shift Group/Supervisor
When there is a change of shift group or supervisor for an employee, user needs to update the changes into the system. This allows accurate attendance tracking of future and historical data.
Steps to Enter Data:
1. Drop down the Data menu and click on Change Shift Group/Supervisor option. The List screen will appear.
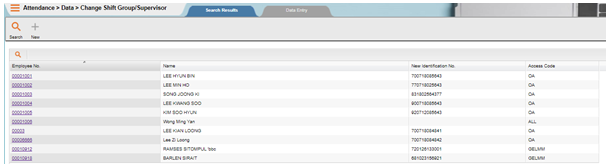
2. Use the List screen to locate the Employee No. or Name or New NRIC No. Click on the ‘SEARCH’ button.

NOTE:
If the entry is not valid, system will indicate a message informing user that there is no record match. Just Click on the ‘SEARCH’ button on the Find dialog and the List screen is displayed. Click to select the Employee No. or Name.
3. The Change Shift Group/Supervisor screen will be shown as follows.
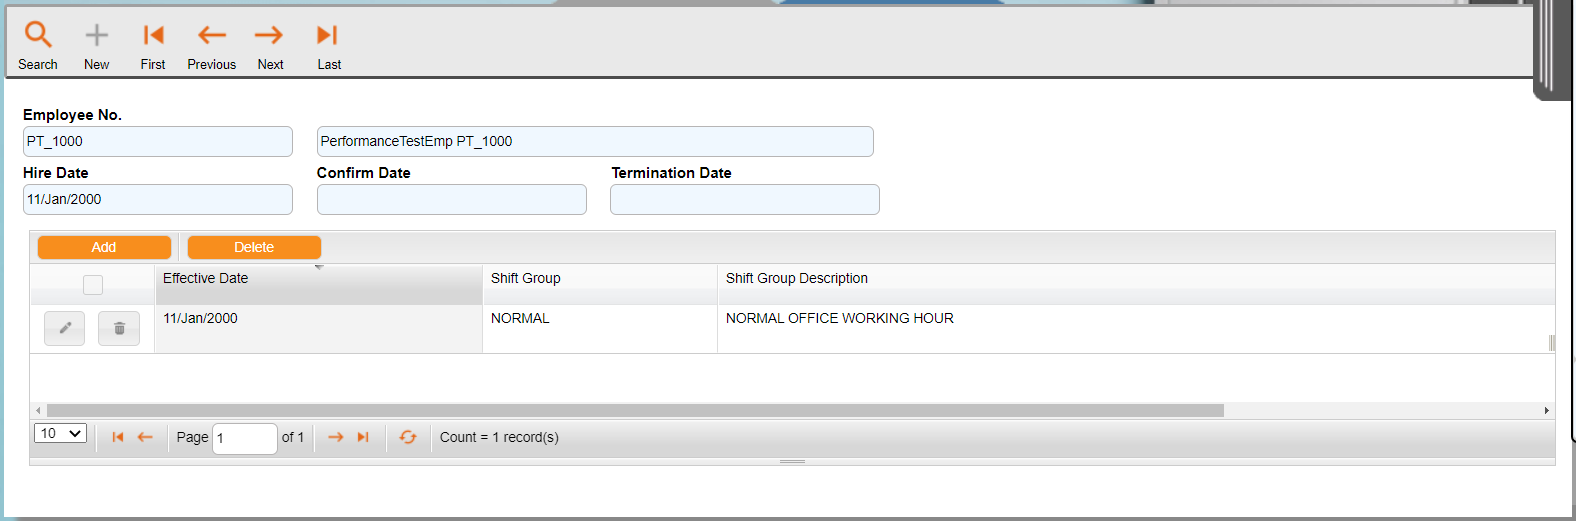
4. Click on the ‘Add’ button in the right side to add new record.
5. Provide the input as below.
- Effective Date
- Enter effective date for the changes of shift group or supervisor.
- Shift Group
- Click on the dropdown button to select the new shift group code (if there is a change on shift group).
- Supervisor
- Click on the dropdown button to select the new supervisor code (if there is a change on supervisor).
6. Click on the ‘Save’ button to save the record entry. The ‘Delete’ button, is to delete a selected record.
7. Click on the ‘Close’ button to exit from the screen.
Attendance Records
Employees’ attendance records are created after you have executed the process ATTENDANCE > Process > Upload & Sort Clock Data or process ATTENDANCE > Process > Compute Attendance Hours. You can also create the attendance records manually in the event an employee forgets to bring his badge. Clock data collected from the time clocks will be sorted based on the employees’ work schedule. Each daily attendance record created can keep up to 10 clock times in a day. The attendance records are then processed to compute work hours, unpaid hours, overtime hours, leave hours or daily allowances.
Steps to enter data:
1. Drop down the Data menu and click on Attendance Record option. The List screen will appear.

2. Use the List screen to locate the Employee No. or Date (Min) or Date (Max) or Exception Code or Employee Name or Employee New NRIC No.Click on the ‘SEARCH’ button.

NOTE:
If the entry is not valid, system will indicate a message informing user that there is no record match. Just Click on the ‘SEARCH’ button on the Find dialog and the List screen is displayed. Click to select the Employee No. and date.
3. The Attendance Record screen will be shown as follows.
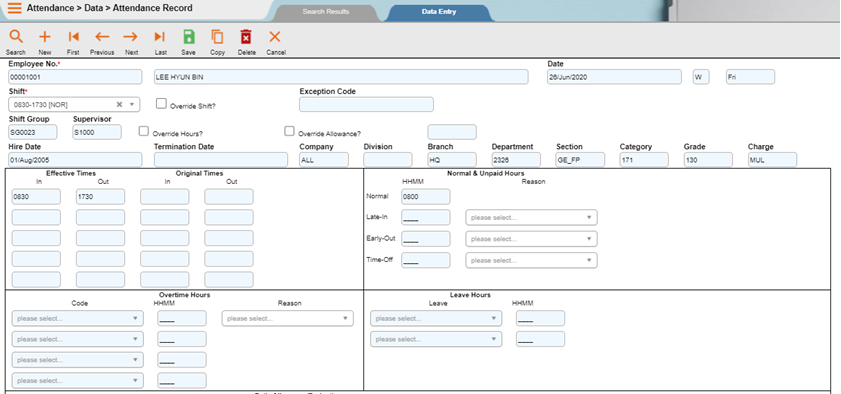
4. Click on the ‘New’ button to add new record.
NOTE:
Normally attendance record will be automatically created when performing daily upload & sort from either clock or text file. Hence, the opportunity to create the attendance record is very slim, unless the employee is added into system after upload & sort is performed.
5. Provide the input as below.
- Normal Work Hours
- Normal work hours refers to work hours within the scheduled in and out times. Lastly, normal hours are only computed on a work day, half day or replacement day. Normal hours are always blank for restday, offday, holiday and shutdown day. User need to tick the ‘Ovr.Hours?’ checkbox if wish to override the system calculated hours.
- Late-In Hours.…Reason
- Late-in hours are only computed on a work day, half day or replacement day when the employee clocks in after schedule in time defined in ATTENDANCE > Setup > Shift setup and exceeds the grace for late-in time defined in ATTENDANCE > Setup > Shift Group setup. Late-In hours are always blank for restday, offday, holiday and shutdown day. Click on the dropdown button to select the late-in reason code if you would like to track late-in reason. User need to tick on the ‘Ovr.Hours?’ checkbox if wish to override the system calculated hours.
NOTE:
Reason code must be pre-defined under MAIN > Setup > Other Codes > Reason with Type Of Reason is LTEIN.
- Early-Out Hours .…Reason
- Early out hours are only computed on a work day, half day or replacement day when the employee clocks out before the schedule out time defined in ATTENDANCE > Setup > Shift setup and exceeds the grace for early-out time defined in ATTENDANCE > Setup > Shift Group setup. Early-Out hours are always blank for restday, offday, holiday and shutdown day Click on the dropdown button to select the early-out reason code if you would like to track early-out reason. User need to tick on the ‘Ovr.Hours?’ checkbox if wish to override the system calculated hours.
NOTE:
Reason code must be pre-defined under MAIN > Setup > Other Codes > Reason with Type Of Reason is E/Out.
- Time-Off Hours.…Reason
- Time-off hours are only computed on a work day, half day or replacement day when employee total break time exceeds the scheduled break time duration defined in ATTENDANCE > Setup > Shift setup. Time-off hours are always blank for restday, offday, holiday and shutdown day. Click on the dropdown button to select time-off reason code if you would like to track time-off reason. User need to tick on the ‘Ovr.Hours?’ checkbox if wish to override the system calculated hours.
NOTE:
Reason code must be pre-defined under MAIN > Setup > Other Codes > Reason with Type Of Reason is TMOFF.
- Overtime Code….HHMM….Reason
- Overtime hours can be computed for any type of day depending on the setting in overtime schedule and overtime eligibility of the employee. You can override or void computed overtime code hours through the daily attendance screen. You can enter the overtime reason code by clicking on the dropdown button. Tick on the ‘Ovr.Hours?’ checkbox if wish to override the system calculated hours. The overtime is automatically approved if the ‘Ovr.Hours?’ checkbox is ticked.
NOTE:
Reason code must be pre-defined under MAIN > Setup > Other Codes > Reason with Type Of Reason is OVRTM.
- Leave Hours
- Leave hours are only computed when the employee has a leave form. User can enter up to two leave forms for one day. Tick on the ‘Ovr.Hours?’ checkbox if wish to override the system calculated hours.
- Daily Allowances
- Daily allowances are computed if employee’s work times fulfill the conditions set under ATTENDANCE > Setup > Daily Allowance/Deduction. User need to tick on the ‘Overwrite .Allowance?’ checkbox if wish to override the system calculated amount.
- Absent Reason
- Click on the dropdown button to select the absent reason code if you would like to track absent reason for cases where normal hours is empty and the day type is work, half day or replacement.
NOTE:
Reason code must be pre-defined under MAIN > Setup > Other Codes > Reason with Type Of Reason is ABSNT.
- Time Edit Reason
- Click on the dropdown button to select the time edit reason if you would like to track the reason why the attendance record is being edited.
NOTE:
Reason code must be pre-defined under MAIN > Setup > Other Codes > Reason with Type Of Reason is TMEDT
- Explain Sort
- User may check on how the system sorts the attendance information by clicking the ‘Explain Sort…’ button.
- Explain Calcalculation
- User may check on how the system processes the attendance information by clicking the ‘Explain Calc…’ button.
- Exception Code
- System will compute and check the attendance if there any exception. Listed below are the Exception Codes used in flexHR®HRMS Attendance.
- SHG – Invalid Shift Group
- SHF – Invalid Shift
- SCH – Shift not scheduled
- SEQ – Invalid Clocking Sequence
- DAY – Invalid Day Type
- UOT – Unauthorized OT
- HDF – Holiday Forfeit
- ODD – Odd clock times
- B4H – Clocking before hire
- AFX – Clocking after termination
- LVE – Leave hrs > Schd hrs
- OTV – OT Variance
- OTX – Absent from OT planned
- SUS – Clocking during suspension
- LIX – Excessive Late In
- EOX – Excessive Early Out
- OVR – User Overrides All Calculation
- OVH – User Overrides All Hours
- System will compute and check the attendance if there any exception. Listed below are the Exception Codes used in flexHR®HRMS Attendance.
Exception code of UOT
The system will process an exception ‘UOT’ only if the following conditions are met.
1st The setting for ‘Ignore Exception if no OT Apprv?’ in ‘MAIN > Setup > Company Profile’ must NOT be ticked!

2nd The respective OT must be set as ‘Approval Required’ in Shift Group settings.


3rd The setting for ‘Compute OT Without Form?’ in ‘ATTENDANCE > Setup > Shift Group’ is ticked!


4th The OT is NOT set as a compulsory OT in MAIN > Setup > Others Code – Overtime setup.

5th Do not have any OT Plan pre-entered before the processing.
Daily Clock Data
Uploaded clock data will be captured under Daily Clock Data after user performed upload and sort clock data from ATTENDANCE > Process > Upload and Sort Clock Data. However,
flexHR®HRMS Attendance allows user to insert clock data manually when there is a clock failure or unpaired clock data in the attendance record.
Steps to enter data:
1. Drop down the Data menu and click on Daily Clock Data option. The List screen will appear.
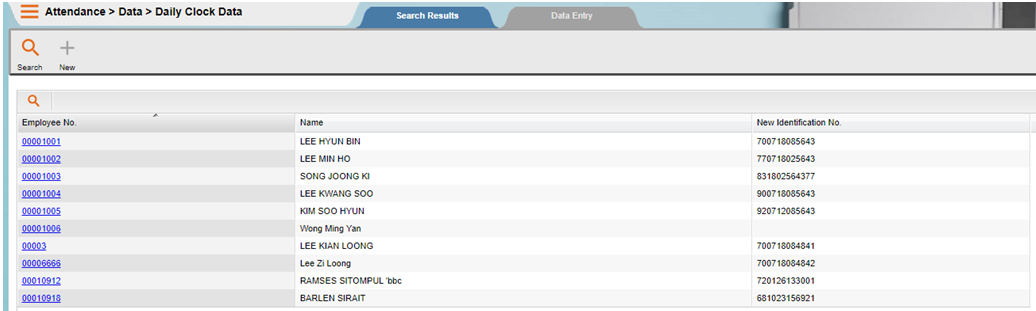
2. Use the List screen to locate the Employee No. or Name or New NRIC No.Click on the ‘SEARCH’ button.

NOTE:
If the entry is not valid, system will indicate a message informing user that there is no record match. Just Click on the ‘SEARCH’ button on the Find dialog and the List screen is displayed. Click to select the Employee No. or Name.
3. The Daily Clock Data screen will be shown as the below.

4. Click on the ‘New’ button to add new record.
5. Provide the input as below.
- Badge No.
- Enter the badge number of the employee up to 10 characters. This entry optional if you manual input the clock time.
- Date
- Enter the date of the record. This refers to the actual date that the clock time was captured.
- Time
- Enter the time of the record in HHMM.
- Clock ID
- Click on the dropdown button to select the clock ID. This refers to the actual clock that the clock time was captured and will affect how system sorts the clock data if hardware control for sorting is turned on.
- Override Sort?
- Check on the checkbox if you would like to override the original sorting and force the system to sort the clock time according to your entry based on the ‘Day’ column.
- First In?
- Check on the checkbox if the record inserted refers to the first in time of the attendance day. You have to check the checkbox of ‘O/Sort?’ to force system to treat the clock time entered as first in time. Otherwise, system will perform its own first in time checking.
- Day
- Click on the dropdown button to select whether the record is referring to previous day (-) or next day (+). If it refers to the same day as the clock time date, leave the column empty.

- Inactive?
Tick on this option if you would like system to ignore this clock data. This is usually for cases where you would like the system to tracks all employee clock time but do not want the system to compute attendance hours based on certain clock times.
NOTE:
Example
Clock out for tea break or attending to visitors.
- Error
- System will automatically tick on this option if error occurs on this clock data.
- Original Date
- System will show the original date if the date of the clock data has been overwritten.
- Original Time
- System will show the original time if the clock time has been overwritten.
- Source.
- This field indicates the source of the clock data.
- C – Clock data is uploaded from clock/text file
- O – Clock data uploaded from clock/text file and it has been overwritten by user
- S – Clock data inserted by system. (Auto clocking method)
- M – Clock data is manually entered by user
- Empty – Clock data is inserted through external program
- This field indicates the source of the clock data.
6. Click on the ‘Save’ button to save the record entry. The ‘Delete’ button, is to delete a selected record.
7. Click on the ‘Close’ button to exit from the screen.
Note:
User will need to process the attendance again by choosing the method Resorting Existing Clock Data, to get the latest attendance information if there are changes made on this screen.
Work Schedule
Before you process the attendance for each individual employee, you must create the work schedule to indicate to the system on what are the shifts that the employee is supposed to work for a particular day. Each employee will have their own shift group, and will follow the work schedule of that shift group. If one particular employee has a special work schedule, then you need to create the individual schedule for that employee.
Work schedule should be created every beginning of the year, and the schedules created must cover the range from start of the year until end of the year. Work schedule can be create under ATTENDANCE > Setup > Shift Group > Shift Group Shift Roster page or under ATTENDANCE > Data > Work Schedule. There are 3 methods to create work schedule through the Data option.
Group Schedule
Work Schedule by Shift Group defines the working pattern of each shift group. Once the working pattern has been defined, the employees under that shift group will follow the working pattern that had been created.
Steps to enter data:
1. Drop down the Data menu and click on Work schedule > Group Schedule option. The List screen will appear.
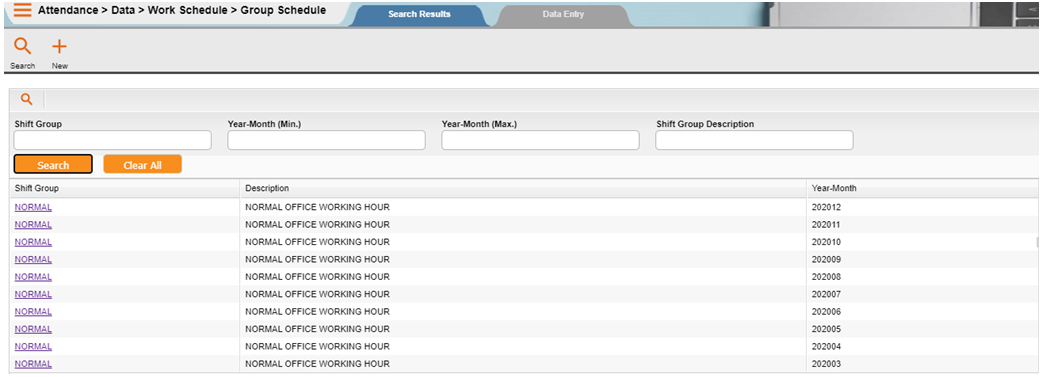
2. Use the List screen to locate the Shift group or Year-Month (min) or Year-Month (max) or shift group description. Click on the ‘SEARCH’ button.

NOTE:
If the entry is not valid, system will indicate a message informing user that there is no record match. Just Click on the ‘SEARCH’ button on the Find dialog and the List screen is displayed. Click to select the shift group.
3. The Group Schedule screen will be shown as the following:
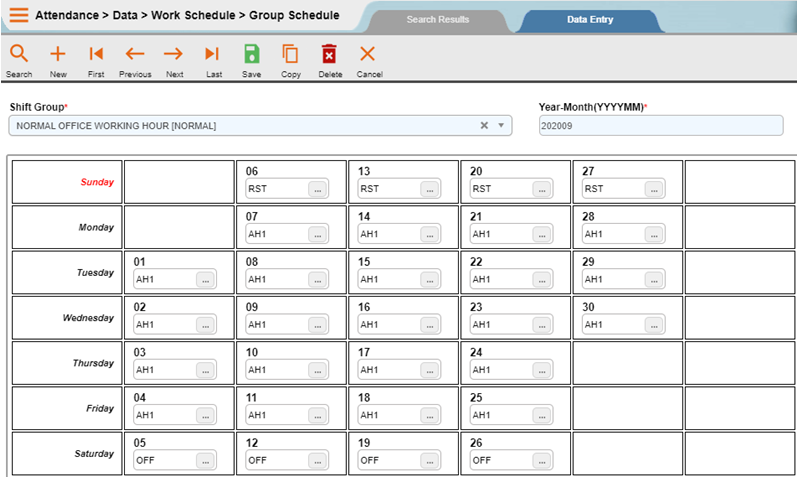
4. Click on the ‘New’ button in the toolbar to add new record.
5. Provide the input as below.
- Shift Group
- Click on the dropdown button to select the Shift Group code that is needed.
- Year-Month
- Enter the period for the work schedule in YYYYMM format.
NOTE:
Example
If you are creating work schedule for January 2007, the period to be entered is 200701.
- 01.…31 (Day)
- For each day of the month, Click on the dropdown button to select the shift code.
6. Click on the ‘Save’ button to save the record entry. The ‘Delete’ button, is to delete a selected record.
7. Repeat the same steps to create the rest of the work schedules until the month of December.
8. Click on the ‘Close’ button to exit from the screen.
NOTE:
User can use Data > Fast Data Entry > Fast Group Schedule Setup to create 12 month’s schedule by 1 click of button. Refer to Fast Group Schedule Setup for the steps.
Individual Schedule by Employee
The individual schedule needs to be created when a particular employee has a different working pattern from the group schedule.
Steps to enter data:
1. Drop down the Data menu and click on Work Schedule > Individual Schedule by Employee option. The List screen will appear.
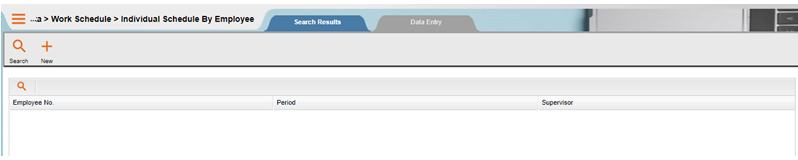
2. Use the List screen to locate the employee No. or Period (min) or Period (max) or Supervisor or Employee Name or Employee New NRIC No. Click on the ‘SEARCH’ button.

NOTE:
If the entry is not valid, system will indicate a message informing user that there is no record match. Just Click on the ‘SEARCH’ button on the Find dialog and the List screen is displayed. Click to select the employee No. and period.
3. The Individual Schedule by Employee screen will be shown as the following:
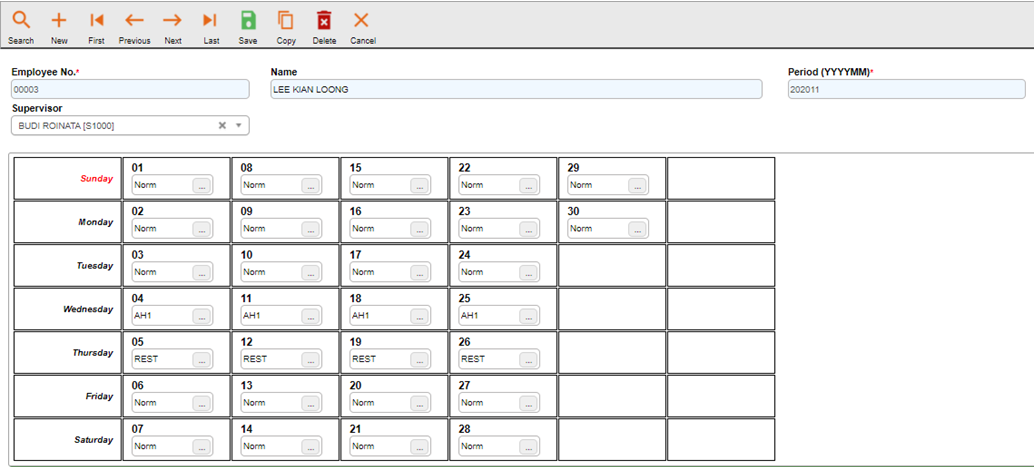
4. Click on the ‘New’ button in the toolbar to add new record.
5. Provide the input as below.
- Employee No.
- Click on the dropdown button to select or enter the employee number up to 12 characters. The name will automatically be displayed beside it.
- Period
- Enter the period for the work schedule in YYYYMM format.
NOTE:
Example
If you are creating work schedule for January 2007, the period to be entered is 200701.
- Supervisor
- Enter employee’s supervisor code. You may click on the dropdown button to choose from the List. This is needed should the user wish to maintain individual schedule by supervisor later on.
- 01.…31 (Day)
- For each day of the month, click on the dropdown button to select the shift code.
NOTE:
User only needs to create the individual schedule if there is a difference between his schedule and the group schedule.
Example
In the month of November, Romlee has his own working schedule; therefore user needs to create the individual schedule for Romlee for the month of November and the days affected. If the days are left empty, system will refer back to the group schedule.
6. Click on the ‘Save’ button to save the record entry. The ‘Delete’ button, is to delete a selected record.
7. Click on the ‘Close’ button to exit from the screen.
Individual Schedule by Supervisor
You can maintain a List of employee schedules that belong to the same supervisor code through Individual Schedule by Supervisor. The changes done in this option will be reflected in ATTENDANCE > Data > Work Schedule > Individual Schedule by Employee as well.
Steps to enter data:
1. Drop down the Data menu and click on Work Schedule > Individual Schedule by Supervisor option. The List screen will appear.

2. Use the List screen to locate the Supervisor or Period or Supervisor Description. Click on the ‘SEARCH’ button.

NOTE:
If the entry is not valid, system will indicate a message informing user that there is no record match. Just Click on the ‘SEARCH’ button on the Find dialog and the List screen is displayed. Click to select the Supervisor and period.
3. The Individual Schedule by Supervisor screen will be shown as the below.
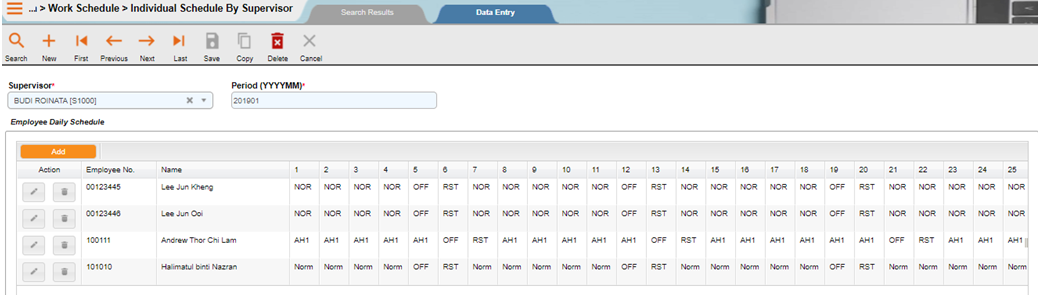
4. Click on the ‘New’ button in the toolbar to add new record.
5. Provide the input as below.
- Supervisor
- Enter supervisor code click on the dropdown button to choose from the List.
- Period
- Enter the period code in YYYYMM.
6. Click on the ‘Add’ button to add new detail record.
- Employee No.
- System will automatically populate all employees that has individual schedule with the same supervisor code as entered above. You may click on the dropdown button at the right side of the screen to add employee.
- 1,2,3,4…………..31
- Enter the shift code for each respective day of the month if there are any changes.
7. Click on the ‘Save’ button to save the record entry. The ‘Delete’ button, is to delete a selected record.
8. Click on the ‘Close’ button to exit from the screen.
NOTE:
Similarly with Schedule by Individual option, user only needs to maintain employee’s schedule if there is a difference between his schedule and the group schedule.
Example
In the month of November, Romlee has his own working schedule; therefore user needs to create the individual schedule for Romlee for the month of November and the days affected. If the days are left empty, system will refer back to the group schedule.
Overtime Plan
In most manufacturing sector, supervisors may need to plan out the schedules for their sub-ordinates to perform overtime. The overtime plan is carried out when there is a need to increase the production level, or when there is not enough manpower.
Steps to enter data:
1. Drop down the Data menu and click on Overtime Plan option. The List screen will appear.
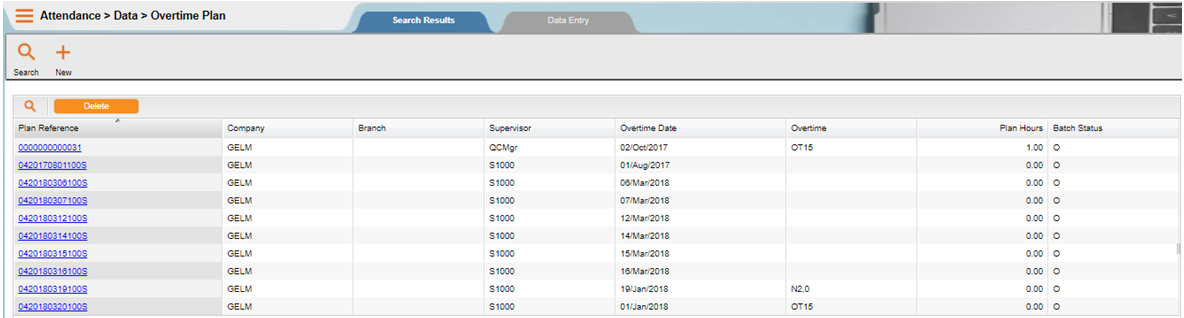
2. Use the List screen to locate the Plan/Approval Reference or Supervisor or Overtime Date (Min) or Overtime Date (Max). Click on the ‘SEARCH’ button.

NOTE:
If the entry is not valid, system will indicate a message informing user that there is no record match. Just Click on the ‘SEARCH’ button on the Find dialog and the List screen is displayed. Click to select the Supervisor and OT date.
3. The Overtime Plan screen will be shown as the following. There are 2 tabs in the Overtime Plan, which are OT Plan General Details and Employees on OT.
OT Plan General Details Tab
This screen enables you to create OT plan with required information such as company, OT date, supervisor, OT code, start and end time, plan hours and OT reason.
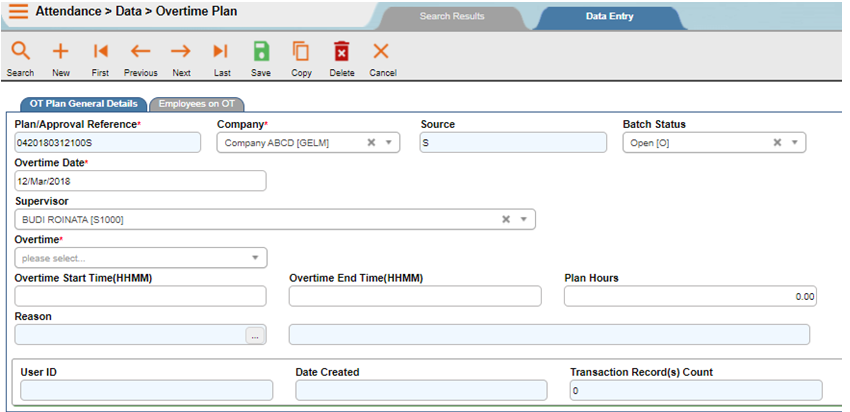
4. Click on the ‘New’ button to add new record.
5. Provide the input as below.
Plan/Apprvl Reference
System will automatically generate Plan/Apprv Reference number. Refer to document type of EXOTBAT_CREFOTPLAN at Main > Admin > Auto-Gen.Doc.Ref No. for the preset format.
Normally the reference number is company reference prefix+serial No..
- Company
- Click on the dropdown button to select company code.
- Batch Status
- Click on the dropdown button to select the batch status, which is Open, Closed, Cancelled or Archived. User may only make changes to the plan details if the batch status is Open.
- OT Date
- Enter the date for the employees to perform the Overtime.
- Supervisor
- Click on the dropdown button to select the supervisor code.
- OT Code
- Click on the dropdown button to select the type of OT that employees need to perform.
- OT Start Time
- Enter the start time for the Overtime in HHMM.
- OT End Time
- Enter the end time for the Overtime in HHMM.
- Plan Hours
- Enter the planned hours for the Overtime.
- Reason
- Click on the dropdown button to select the Overtime Reason. The description will be displayed beside after reason code is selected.
NOTE:
Reason code must be pre-defined under MAIN > Setup > Other Codes > Reason with Type Of Reason is OVRTM.
6. Click on the tab of Employees on OT, click on the ‘Add’ button to start entering the List of employees that need to perform overtime on the specified date.
Employees on OT Tab
This screen enables you to plan employees that required working OT on that particular date.

7. Update the record as below.
- Employee No.
- Click on the three dots button to select the employee number.
- Work Next Shift?
- Tick on the checkbox if the employee performs overtime before start of work.
- Transport?
- Tick on checkbox if that employee needs transport arrangement.
8. Click on the ‘Save’ button to save the record entry. The ‘Delete’ button, is to delete a selected record.
9. Click on the ‘Close’ button to exit from the screen.
Update OT Approval
When an employee works extra hours before or after the normal working hours, system will consider the extra time as Overtime. For overtime that is not scheduled/planned, supervisors and superiors will need to approve the overtime before exporting the data to Payroll for salary processing.
There are 2 types of approvals:
- Overtime approval by supervisor
- Overtime approval by employee
During the AUTO creation of the OT Plan record, the system will also need to create the OT Batch header record as well. As such, the primary key for the table – OT Batch Ref No. will be auto generated. Below is the formula the system uses to formulate the reference No..
Ref No. = Company Prefix (2 digits)+”YYYYMMDD”+Supervisor Suffix (3 characters)+”S”
NOTE:
If you want to use the ‘OT Approval by Supervisor’ to approve OT for employee, please take note that Supervisor Suffix in each supervisor code setup in MAIN > Setup > Basic Codes > Supervisor must be defined and unique.
This is because supervisor suffix is one of the components that formulate the OT Batch Ref No.If there is any employee that belong to a supervisor code with its corresponding supervisor suffix is empty (i.e. the system will store as ‘000’ if the supervisor suffix is empty) or is the same as other supervisor code suffix, it will cause the system to assign the employees with the same OT Batch Ref No. even though the supervisor code is different.
Moreover, the system refers to the ‘Supervisor Code’ as defined in OT Batch header when retrieving the List of employees for each Supervisor during ‘OT Approval by Supervisor’. Therefore, if you do not define the supervisor suffix correctly, you may end up having employees who belong to different supervisors, but are grouped under the same OT Batch Ref No.!
Approval by Supervisor
This type of approval is follows the supervisor code of employee. It will list down all the employees belong to the selected supervisor only. Hence, it will be easier for supervisor to approve their sub-ordinates.
Steps to enter data:
1. Drop down the Data menu and then click on Update OT Approval > Approval by Supervisor option. The List screen will appear.

2. Use the List screen to locate the Supervisor code and OT date. Click on the ‘SEARCH’ button.

3. The Approval by Supervisor screen will be shown as the following:

4. The Update Overtime Approval screen will show all the employees that belong to the supervisor and had performed overtime on the selected date. User may click on the ‘Approve All’ button to do the quick approve for all the records. There are 4 options when doing global approval. User may choose one of the options below to approve overtime.
- Minimum between Planned and Actual OT
- System will take whichever minimum overtime hours between planned and actual OT.
- Follow the Planned OT hours
- System will follow the planned OT hours.
- Follow Actual OT Hours
- System will follow the actual OT hours performed.
- Void OT Hours
- System will void the OT hours to zero.
5. To approve overtime records individually from the employee listing, go to individual column and update as below.
- Override
- Click on the dropdown button to select the override method for OT approval. The result will update into ‘Apprv’ field. The available options are as below.

-
- 1 – Minimum
- System will take the overtime hours is lower overtime hours between planned and actual OT.
- 2 – Plan/Approved
- System will follow the planned or approved OT hours.
- 3 – Actual
- System will follow the actual OT hours performed.
- 4 – Void
- System will void the OT hours to zero.
- G – Shift Group
- This OT approval is posted from E-OT module or if there was an overtime plan record entered through ATTENDANCE > Data > Overtime Plan earlier. Here, system will refer to the default override method defined in employee Shift Group setting.
- 1 – Minimum
- Apprv
- Update the approved OT hours. But still when compute attendance hours, system will compare the method selected as well in such manner.
- Method Description
- System will take whichever is lower between actual OT and approved hour entered
- System will take the final OT hour entered here
- System will always refer to actual OT regardless what OT hour entered here
- System will always void the OT regardless what OT hour entered here
- If shift group define as minimum, then it will follow method 1. But if define as method scheduled/approved OT, then it will follow method 2
6. There is an option to update the OT Reason as well at the bottom of the screen for each record that had been highlighted. Click on the dropdown button to choose the available reason codes from the system.
7. User can click on the ‘Previous Day’ button to go to previous day, or ‘Next Day’ button to go to next day. Refer to screen snap shot above, the previous day will be 02/10/2013 whereas the next day is on 04/10/2013.
Approval by Individual
This option allow user to approve the employee OT hour one by one. User needs to find the employee and then input the approved method and OT hour accordingly. It is useful especially for the company that did not practice the control by supervisor.
Steps to enter data:
1. Drop down the Data menu and click on Update OT Approval > Approval by Individual option. The List screen will appear.
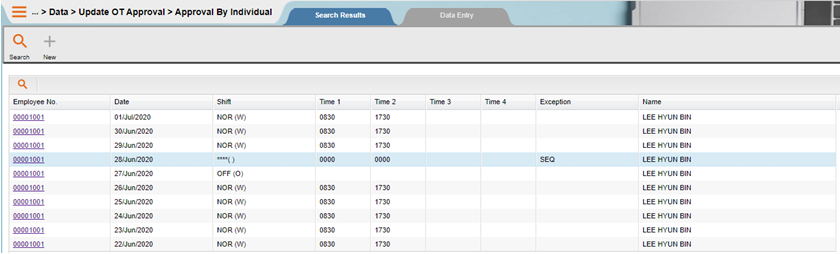
3. Use the Search screen to locate the employee No. or date Min and date Max. or exception code or Employee name or employee new NRIC No. Click on the ‘SEARCH’ button.

NOTE:
If the entry is not valid, system will indicate a message informing user that there is no record match. Just Click on the ‘SEARCH’ button on the Find dialog and the List screen is displayed. Click to select the employee No. and date.
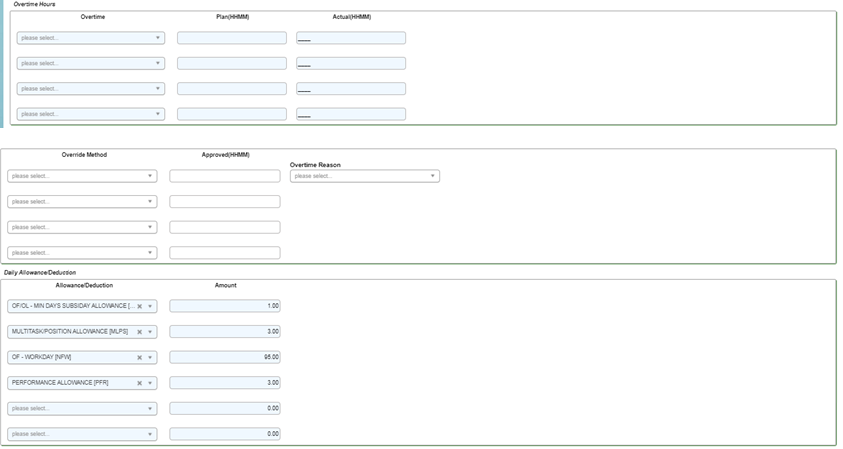
3. The Approval by Individual screen will be shown as the following. Update the information below to finalize the approval.
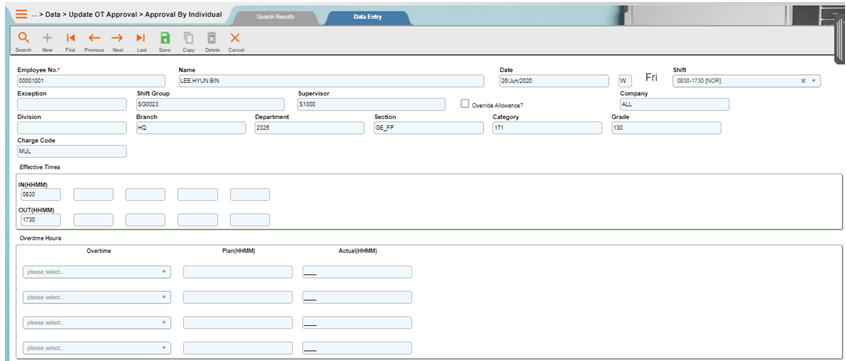
- Override. Method.
- Click on the dropdown button to choose override method from the List as per print screen below.

- 1 – Minimum
- System will take whichever is the lower overtime hours between planned and actual OT.
- 2 – Plan/Approve
- System will follow the planned or approved OT hours.
- 3 – Actual
- System will follow the actual OT hours performed.
- 4 – Void
- System will void the OT hours to zero.
- G – Shift Group
- This OT approval is posted from E-OT module or if there was an overtime plan record entered thru ATTENDANCE > Data > Overtime Plan earlier. Here, system will refer to the default override method defined in employee Shift Group setting.
NOTE:
Reason code must be pre-defined under MAIN > Setup > Other Codes > Reason with Type Of Reason is OVRTM.
- Override Allowance?
- Check the checkbox here if you wish to amend the computed allowance or deduction. The Daily Allowance portion will be activated once you check the box.
Badge Assignment
You can issue a temporary badge to employee so that system can recognize the employee’s attendance when his/her badge has been lost or is waiting for new replacement badge.
Steps to enter data:
1. Drop down the Data menu and then click Badge Assignment option. The List screen will appear.

2. Use the List screen to locate the employee No. or Employee name or employee new NRIC No.Click on the ‘SEARCH’ button.

NOTE:
If the entry is not valid, system will indicate a message informing user that there is no record match. Just Click on the ‘SEARCH’ button on the Find dialog and the List screen is displayed. Click to select the employee No.
3. The Badge Assignment screen will be shown as below.

4. Click on the ‘New’ button to add new record.
5. Enter data as below.
- Employee No.
- Click on the dropdown button to select the Employee No. The Employee Name will be refreshed accordingly.
- Badge No.
- Enter the temporary badge number under Badge No. up to 10 characters.
- Start Date
- Enter the start date where the temporary badge is take effect.
- End Date
- Enter the end date where the temporary badge is expired.
- Reason
- Click on the dropdown button to select the reason code (if any).
NOTE:
Reason code must be pre-defined under MAIN > Setup > Other Codes > Reason with Type Of Reason is OVRTM.
6. Click on the ‘Save’ button to save the record entry. The ‘Delete’ button, is to delete a selected record.
7. Click on the ‘Close’ button to exit from the screen.
Fast Data Entry
flexHR®HRMS Attendance module provides the global updates for certain setup and entries, such as Fast Group Schedule Setup, Fast Employee Shift Change, Fast Auto Clock Time Entry, Fast Clock Time Edit, Fast Shift Group Change, Fast Overtime Approval Entry, Fast Employee Schedule and Fast Holiday Exclude. Fast data entry allows you to do data entry in a faster and more convenient way. This is usually used for a group of employees who have some similarities.
Fast Group Schedule Setup
Group Schedule is the place where you can define the working calendar for each shift group. The data created will range from the schedule start date entered by user till end of calendar year.
Steps to enter data:
1. Drop down the Data menu and click on Fast Data Entry > Fast Group Schedule option.
2. The Fast Group Schedule screen will be shown as the following:
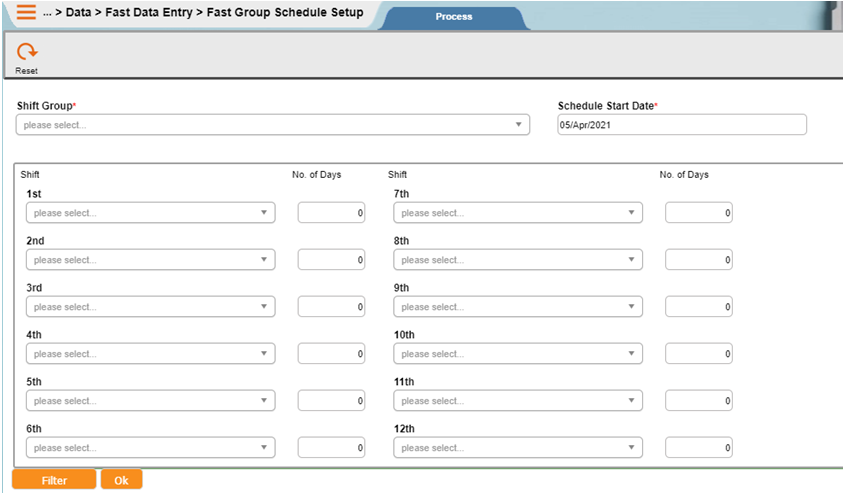
3. Enter the input to the text boxes as below.
- Shift Group
- Click on the dropdown button to select the Shift Group that you want to create for the working schedule.
- Schedule Start Date
- Enter the Start Date for the working schedule.
- Shift Code
- Click on the dropdown button to select the shift code to plan the schedule pattern.
- Days
- Enter number of days for that shift code in this roster.
NOTE:
Example
If schedule reference date is 01/01/2006, system determines that SOFF will be the schedule from 01/01/2006 to 05/01/2006 (5 days), SOOF as the schedule on 06/01/2006 (1 day) and SOFR as the schedule for 07/01/2006 (1 day). System will repeat for next 5 days, 1 day and 1 day.
4. Click on the ‘Filter’ button if you like to do filtering, or press on the ‘OK’ button to proceed.
Fast Employee Shift Change
This option allows the user to perform global update on the shift code change by employees. Changes can optional on day of week, such as Monday only. The entries done will be updated to ATTENDANCE > Data > Work Schedule > Individual Schedule by Employee option.
Steps to enter data:
1. Drop down the Data menu and click on Fast Data Entry > Fast Employee Shift Change option.
2. The Fast Employee Shift Change screen will be shown as the following:

3. Enter the input to the text boxes as below.
- Start Date
- Enter the start date when the shift starts to change.
- End Date
- Enter the end date when the shift change stop.
- Change from Shift
- Enter the original shift code. Enter as ‘*’ or leave empty if to apply to all shift codes.
- To Shift
- Enter the new shift code.
- Monday/Tuesday/Wednesday/Thursday/Friday/Saturday/Sunday
- Select the days that are affected by the shift changes.
NOTE:
Example
If you check on Tuesday only, then the change of shift code will be affected on every Tuesday in the range of dates specified.
- Query Code
- Click on the dropdown button to select the defined query code.
NOTE:
Query code must be pre-defined under MAIN > Setup > Query.
4. Click on the ‘Filter’ button if you like to do filtering, or press on the ‘OK’ button to proceed.
NOTE:
You may skip the ‘Filter’ part if you would like to change shift code for all employees that meeting above defined criteria.
Fast Auto Clock Time Entry
When the clock fails, user can use this option to do mass creation of clock data.
Steps to enter data:
1. Drop down the Data menu and then click Fast Data Entry submenu. Click on Fast Auto Clock Time Entry option.
2. The Fast Auto Clock Time Entry screen will be shown as the following:
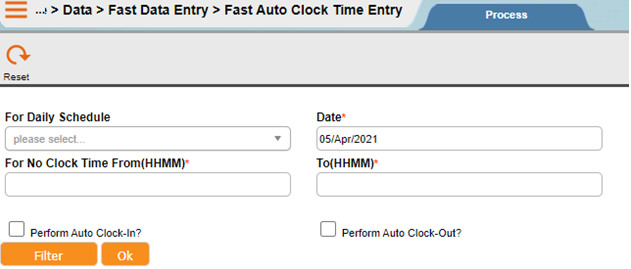
3. Enter the input to the text boxes as below.
- For Daily Schedule
- Enter the shift code or Click on the dropdown button to select.
- Date
- Enter the attendance date that is needed to do the global update.
- For No Clock Time From….To
- Enter the range of time for the system to check. Include a ‘-‘ or ‘+’ sign at the back of the time (in HHMM) to indicate previous day or next day respectively. System will insert the clock time if there are no clock time found between the time ranges entered.
- Perform auto clock in
- Check if you are inserting the IN time. System will update the time based on shift code Schedule In time defined in the ATTENDANCE > Setup > Shift.
- Perform auto clock out
- Check if you are inserting the OUT time. System will update the time based on shift code Schedule Out time defined in the ATTENDANCE > Setup > Shift.
- Query Code
- Click on the dropdown button to select the defined query code.
NOTE:
Query code must be pre-defined under MAIN > Setup > Query.
4. Click on the ‘Filter’ button if you like to do filtering, or press on the ‘OK’ button to proceed.
NOTE:
You may skip the ‘Filter’ part if you would like to run auto clock time for all employees that meeting above defined criteria.
System will create data with clock ID ‘00’.
Fast Clock Time Edit
There are times where user needs to perform amendment to existing clock data, possibly due to company bus being late or time clock is not synchronized with correct time. flexHR®HRMS Attendance has an option that allows user to perform global time edit should the need arises. System will still maintain the original clock times in the ‘Original’ column of clock data.
Steps to enter data:
1. Drop down the Data menu and click on Fast Data Entry > Fast Clock Time Edit option.
2. The Fast Clock Time Edit screen will be shown as the following:
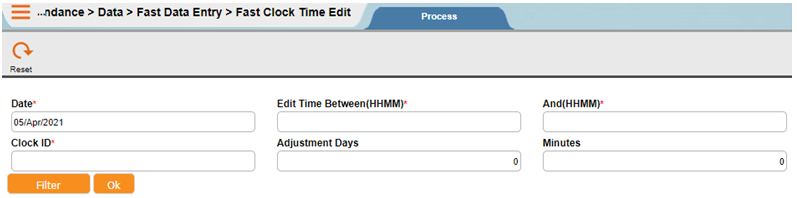
3. Enter the input to the text boxes as below.
- Date
- Enter the date that needs to be edited. This date refers to actual date where the clock data is being captured.
- Edit Time Between….And
- Enter the time range for system to check. System will edit the clock time that falls between the time ranges entered.
- Clock ID
- Enter the clock ID for which the clock time is incorrect.
- Adjustment Days….Minutes
- Enter the value in days or minutes, to adjust back to the correct time. If you wish to reduce from the original time, then remember to put a ‘-‘ in front of the value entered. Otherwise, it will increase the original time.
- Query Code
- Enter the query code by clicking on the ‘Filter’ button.
NOTE:
Query code must be pre-defined under MAIN > Setup > Query.
4. Click on the ‘Filter’ button if you like to do filtering, or press on the ‘OK’ button to proceed.
NOTE:
You may skip the ‘Filter’ part if you would like to edit clock time for all employees that meeting above defined criteria.
System only edits clock time where the source is ‘C – Clock’ or ‘S – System’.
Fast Shift Group Change
User needs to run this option when there is a group of employees involved in the changing of Shift Group or Supervisor.
Steps to enter data:
1. Drop down the Data menu and click on Fast Data Entry > Fast Shift Group Change option.
2. The Fast Shift Group Change screen will be shown as the following:

3. Enter the input to the text boxes as below.
- Change to Shift Group
- Enter the new shift group code that employees are going to be transferred to. Leave empty if to remain the shift group as it is (to change supervisor only).
- New Supervisor
- Enter the new supervisor code that employees are going to be transferred to. Leave empty if to remain the supervisor code as it is (to change shift group only).
- WEF Date
- Enter effective date of the transfer record.
- Update Individual Schedule
- Tick on the checkbox if you want to update the work schedule from the group to individual schedule.
- Query Code
- Enter the query code by clicking on the ‘Filter’ button if any.
NOTE:
Query code must be pre-defined under MAIN > Setup > Query.
4. Click on the ‘Filter’ button if you like to do filtering, or press on the ‘OK’ button to proceed.
NOTE:
You may skip the ‘Filter’ part if you would like to change shift group or supervisor for all employees that meeting above defined criteria.
Fast Overtime Approval Entry
User may use this Fast Overtime Approval Entry option to approve overtime quickly if there is a group of employees who have the same OT, OT hours, allowance or OT reason.
Steps to enter data:
1. Drop down the Data menu and click on Fast Data Entry > Fast Overtime Approval Entry option.
2. The Fast Overtime Approval Entry screen will be shown as the following:
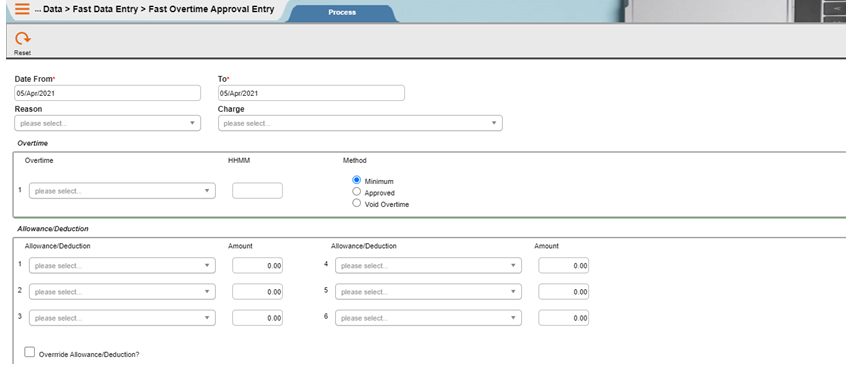
3. Enter the input to the text boxes as below.
- Date From ….To
- Enter the range of overtime date that you would like to approve.
- Overtime Code …. HHMM
- Enter the overtime code and total OT hours that you would like to approve.
- Allowances Code … Amount
- Enter the Allowance code and amount if any. You may enter up to a maximum of 6 allowances.
- Override Allowance.?
- Tick on the checkbox if you want to override default allowances that are computed by system. If left unchecked, system will not accept the allowances code and amount entered by user here.
- Override Method
- Select an override method for the OT approval record. The available options are:
- Minimum
- System will take whichever are lower overtime hours between approved and actual OT.
- Approved
- System will follow the OT hours entered by user.
- Void OT
- System will void the OT hours.
- Minimum
- Select an override method for the OT approval record. The available options are:
- Reason
- Click on the dropdown button to select OT reason code if any.
NOTE:
Reason code must be pre-defined under MAIN > Setup > Other Codes > Reason with Type Of Reason is OVRTM.
- Charge
- Enter the charge code if any.
NOTE:
Charge code must be pre-defined under MAIN > Setup > Basic Codes > Charge.
- Add or Add/update or Delete
- Choose an option on how you would like system to create the OT form. The available options are:
- Add
- System will create new OT form if no record found.
- Add/update
- System will replace the existing OT form if any found by referring to the OT date with the latest input you entered.
- Delete
- System will delete the OT form for the specified date range.
- Add
- Choose an option on how you would like system to create the OT form. The available options are:
4. Click on the ‘Filter’ button if you like to do filtering, or press on the ‘OK’ button to proceed.
NOTE:
You may skip the ‘Filter’ part if you would like to approve overtime for all employees that meeting above defined criteria.
Fast Employee Schedule Setup
Employee Schedule is the individual working schedule for a particular employee. User needs to setup the individual schedule if the particular employee has different working schedule from the group schedule.
Steps to enter data:
1. Drop down the Data menu and then click Fast Data Entry > Fast Employee Schedule option.
2. The Fast Employee Schedule screen will be shown as the following:
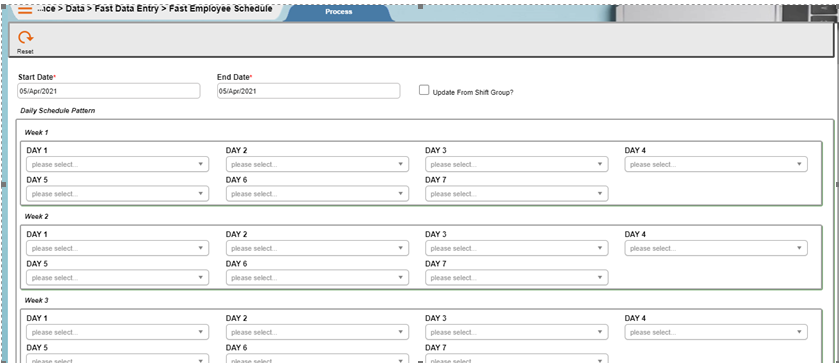
3. Enter the input to the text boxes as below.
- Start Date….End Date
- Enter the employee schedule start and end date that you want to create.
- Update from Shift Group?
- Tick on the checkbox if you want the employee schedule to follow shift group schedule. If this is ticked, user may skip on item c below.
- Daily Schedule Pattern
- Click on the dropdown button to select the shift code for the schedule pattern.
NOTE:
First box refers to the day of the Start Date, and continues for the rest of the six days in a week.
Example
Refer to the screen shot above, if the start date is Monday. So the first box will refer to Monday, the second box will refer to Tuesday and so on.
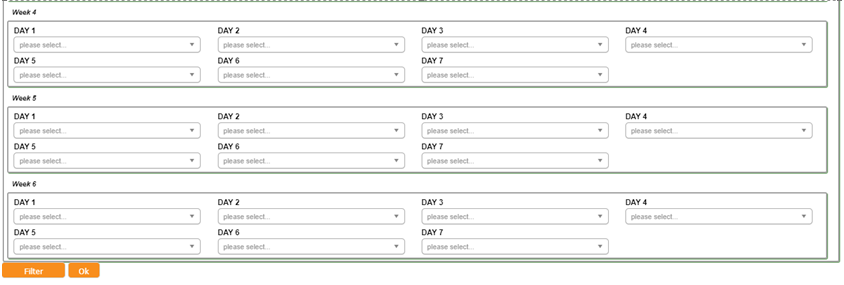
If you are creating the working schedule for 3 rotating shifts.
Example
First week is working morning shift, second week is working in afternoon shift and third week is working in night shift, then rotate back to morning shift again. So the setting is:
Week 1: Morning shift
Week 2: Afternoon shift
Week 3: Night shift
4. Click on the ‘Filter’ button if you would like to do filtering, or press on the ‘OK’ button to proceed.
NOTE:
You may skip the ‘Filter’ part if you would like to create employee schedule for all employees.
Fast Holiday Exclude
There are times where holiday is not applicable for all employees in the company. This option allows user to exclude the holiday to a group of employees based on filter criteria defined when running this process.
Steps to enter data:
1. Drop down the Data menu and click on Fast Data Entry > Fast Holiday Exclude option.
2. The Fast Holiday Exclude screen will be shown as the following:

3. Enter the input to the text boxes as below.
- Holiday/Shutdown Reference
- Click on the dropdown button to select the holiday or shutdown reference code.
- Query Code
- Click on the dropdown button to select query code for filtering the employee needed for holiday or shutdown exclusion.
NOTE:
Query Code must be pre-defined under MAIN > Setup > Query.
4. Click on the ‘Filter’ button to do the necessary filtering and press on the ‘OK’ button to proceed.
NOTE:
You may skip the ‘Filter’ part if you have entered Query Code.
Fast Attendance Shift Code
Steps to enter data:
1. Drop down the Data menu and click on Fast Data Entry > Fast Attendance Shift Code option.
2. The Fast Holiday Exclude screen will be shown as the following:
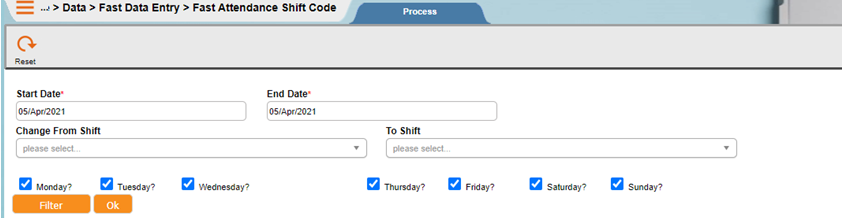
3. Enter the input to the text boxes as below.
- Start Date
- Enter the start date when the shift starts to change.
- End Date
- Enter the end date when the shift change stop.
- Change from Shift
- Enter the original shift code. Enter as ‘*’ or leave empty if to apply to all shift codes.
- To Shift
- Enter the new shift code.
- Monday/Tuesday/Wednesday/Thursday/Friday/Saturday/Sunday
- Select the days that are affected by the shift changes.
NOTE:
Example
If you check on Tuesday only, then the change of shift code will be affected on every Tuesday in the range of dates specified.
4. Click on the ‘Filter’ button to do the necessary filtering and press on the ‘OK’ button to proceed.
